Step 1
Log into your OLD Gmail account
Step 2
Open Settings and click on the Forwarding and POP/IMAP tab

Select Enable POP for all mail
Select keep Gmail’s copy in the inbox
At the bottom, click Save Changes.
Step 3
If you don’t have a Gmail account you will have to sign up for a new account.
If you already have a NEW Gmail account, log in now.
https://myaccount.google.com/u/5/signinoptions/two-step-verification/enroll-welcome
Click Get Started
Enter your password to confirm it is really you
Enter your phone number when it prompts you to
Once you receive the text message, enter the code you received

Step 4
Open Settings and click on the account tab

Under the Send mail as section click on Add another email address
Step 5

Enter your name and your OLD email address
Uncheck Treat as an alias
Click Next Step
Step 6

On the next screen, make sure SMTP Server is smtp.gmail.com
Username is the first part of your NEW address, without the @gmail.com (e.g. just “user” if your email is user@gmail.com.
Password is the password for your NEW address
Click Save Changes and you will be sent an email to confirm.
Step 7

When you have received the confirmation email, copy and paste the code into the box and click Verify.
Step 8

Under Send mail as, click Make Default next to your OLD email address, so that all email will be sent using that email address instead of the @gmail.com address.
Step 9
Open Settings and click Accounts and Import

Click Import mail and contacts
Step 10
In the box that pops up, enter the email address of your OLD account

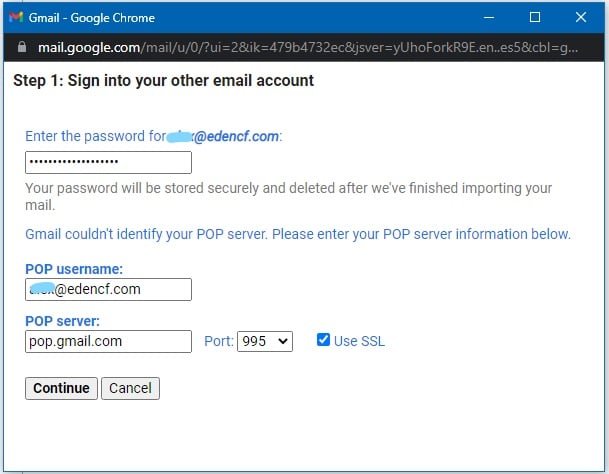
Then you may see either Window 1 or Window 2 shown below:

If you see this option, make sure that Import email is selected and click Next

Neded to create app password here


Update the username with your OLD email address, and update the server details as shown above.
Step 11
You may have a security issue at this point depending on how your OLD account is set up.
If you are using 2-Step Verification you will need to create an App Password.
If you are not using 2-Step Verification then you will need to enable it, and then create an App Password.
Once you have created an App Password, use this instead of your account password in the Sign in screen.
Click Continue, and you should be able to proceed to Step 7.
Step 12

Click Start Import and the operation should run in the background. Depending on the amount of email you have, this may take several hours to complete.
Make sure you check the Spam folder in the new account as some of your emails may end up in there during the import.
Step 13
Please email alex@hcmail.net specifying your new and old email addresses and you will be added to the forwarding database so once the old email accounts are retired you will continue to receive all of your email.
